Mirroring Configuration:
For the Mirroring Configuration we need
three servers.
The below are the three Servers used in
configurations.
- SRIHAAN-PC -- Primary Server
- SRIHAAN-PC\DELL –Secondary Server
- SRIHAAN-PC\WITNESS --Witness Server

Mirroring Concept:
Database
mirroring was introduced with Microsoft SQL Server 2005 technology
that can be used to design high-availability and high-performance
solutions for database redundancy. It is designed to maintain a hot
standby server with a transitionally consistent copy of the database.
Mirroring is cost-effective, speedy, requires no special hardware,
and ensures transactional consistency.
In
the Primary Server we have the database called Simplex and we would
be creating the mirror of the database on the Secondary server.

First
we have to take the Full
Backup of
the database on the Primary server.
BACKUP
DATABASE Simplex TO DISK=’E:\BACKUP\Simplex.BAK’
GO
The
Full Backup taken on the Primary Server has to be copied to the
secondary server and this backup has to be restored on the Secondary
Server with NORECOVERY
mode.
RESTORE
DATABASE Simplex FROM DISK=’D:\BACKUP\Simplex.BAK’ WITH
NORECOVERY.
GO

The Backup of the database on the
Primary Server and Restoring on the Secondary Server has been
completed and now the servers are ready for the configuring of the
Database Mirroring.
Step for the Database Mirroring.
On the Primary
Database Server Right click on the Simplex Database
Tasks Mirror.

Clicking on this
Opens up a window as Database Properties – Simplex.

The above is the
mirroring configuration window. Click on the Configure Security
button.

The above figure
shows the configuration of the Database Mirroring Information to be
setup.

The above figure
shows the information regarding the witness server that has to be
setup or not. Click on the Yes and click on the Next button.

Here in the above figure we would be
configuring the Witness server. Click Next.

In the above figure we would be
configuring the Pricipal Server i.e., Select the Server that acts as
the Primary Server. And the Listener port specified here are the
default port numbers use for the database mirroring. We can also
change the port listeners according to our criteria. Click Next.

Here we have to select the Mirror
Server that the server selected would be acting as the Mirroring
Server. Listener port is the default port used by the Database
Mirroing. Click Next.

We would be select the Server i.e.,
witness server. If any of the server stops / failovers that
information is stored at witness and makes a failover to the Mirror
Server. Click Next.

If we have the service accounts created
i.e.., different service account for the server that has to specified
here. If not leave it blank if the database mirroring is configured
on a single service account. Click Next.

The above figure shows the information
of the Principal, Mirror and Witness Server. Click Finish.

The above figure shows that the
Principal, Mirror and Witness Server has been configured
successfully. Click Close.

In the above figure we have to click on
the Start Mirroring. So the Mirroring starts on the servers.
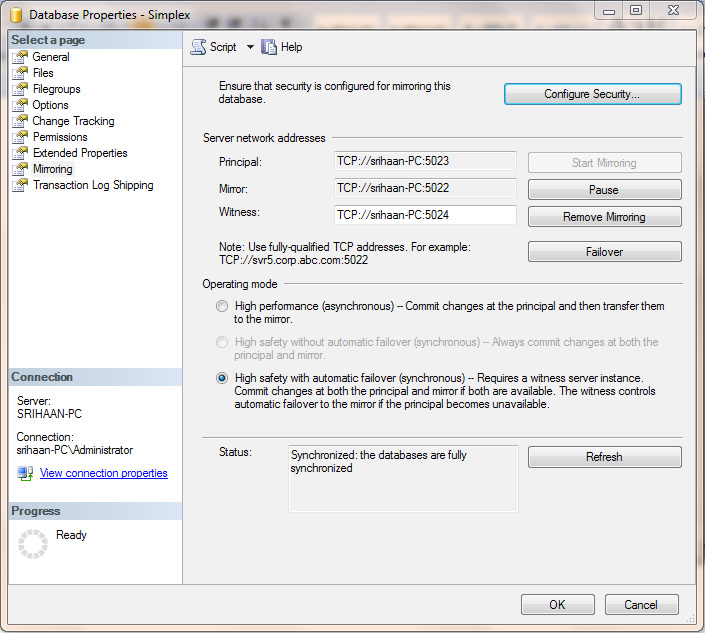
The above figure show the information
that is Database Mirroring is configured on the servers and has been
started.
It also shows the information that the
databases are fully synchronized on both the Servers.
Now we would be performing the Failover
of the Primary Server to the Mirror Server.

In the above figure we are inserting a
record into the table i.e., the Primary server and after this we
would stop the services of the Primary Server such that the Machine
has been shutdown and we would see the failover to the Secondary and
see the database is synchronized or not.
Now go to Start
Runservices.msc

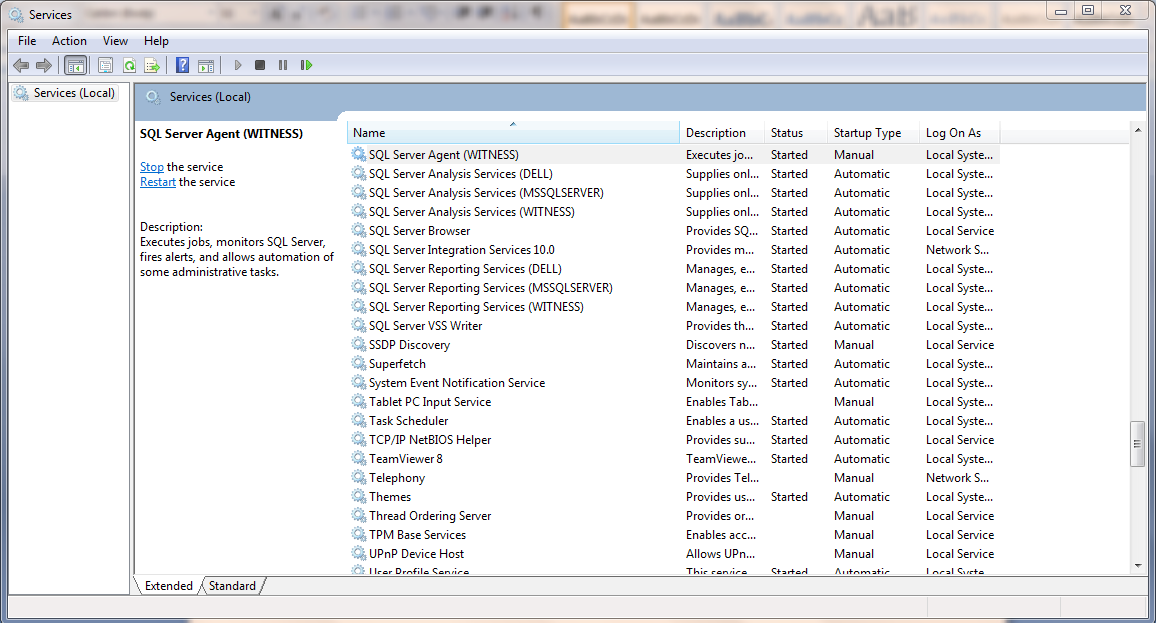
In the above figure we have stopped the
services of the Primary Server.

The above figure show the Failover has
been done successfully. The data inserted into the Primary server
reflected to the Secondary also.

Now we would be starting the services
of the Primary Server. Now the Primary Server would be acting as the
secondary and the database would be in the Restoring State.
Now we would be making a failover on
the secondary server so that Primary takes its own charge.
Go the properties of the database on
secondary server.

Now click on the Failover button.

The above figure opens up and Click on
the Yes.
Comments